


Leaderboard
-
- All areas
- Articles
- Article Comments
- Pages
- Page Comments
- Natives
- Native Comments
- Parameters
- Components
- Component Comments
- Voices
- Voice Comments
- Speech Lines
- Speech Line Comments
- Tutorials
- Tutorial Comments
- Peds
- Ped Comments
- Animations
- Animation Comments
- Releases
- Release Comments
- Guides
- Guide Comments
- Features
- Feature Comments
- Settings
- Setting Comments
- Files
- File Comments
- File Reviews
- Images
- Image Comments
- Albums
- Album Comments
- Topics
- Posts
-


Popular Content
Showing content with the highest reputation since 02/20/2026 in Files
-
2 points
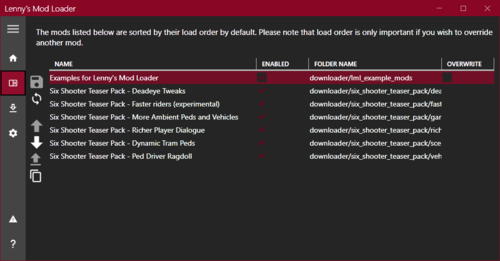 The general idea of Lenny's Mod Loader is to provide an easy way to modify the game. In its current state for RDR 2 it will allow you to replace any file in the game, whether they are streaming files such as models or data files, font files etc. It also includes full UI support akin to the GTA V version. The three screenshots show replaced assets, replaced font and an altered meta file to change the police response in Valentine to Saint Denis police. These are all provided in an example download, see "Examples" further down below for more information. Installation 1.) Copy all files from "ModLoader" into your RDR 2 game root folder so that files such as vfs.asi are in the same folder as your RDR2.exe. 2.) The Mod Manager folder can be anywhere and does not need to be inside the game folder. 3.) New mods go into lml folder or use the button "Download with Mod Manager" on the mod website if it is supported (see installation video for an example). Beta 11 highlights - Data file merge and manifest support A few new exciting features are part of this update. First, support for overriding files used very early during game load has been improved significantly. While I hope that this does not cause any side-effects, please let me know if mods that worked well previously no longer function correctly. For instance, it was not possible in previous versions to override the skydome textures to change the moon. Thanks to @VideoTech for testing. Second, data file loading allows you to separate your changes to certain files, such as assets_* or metapeds into individual files so that you no longer have to modify the existing one (effectively merging them). This should make it a lot easier to create mods such as custom peds since you can contain most changes to separate files. Please note that this does not magically work for all games files but only those where the internal game parser supports additions (so no catalog for instance). In addition, custom manifest files for peds and maps are supported now. The ped support has been tested extensively, but map support will only really become useful once CodeX can generate these files for you. An example for these features is provided in the download courtesy of BHmaster. Beta 9 highlights Very much a maintenance update, this version hopefully fixes the random DRM integrity crashes. Thanks a lot to @calledme.kev who spent tens of hours testing various builds to find the issue! It also adds a lot of caching for collection calls that rely on read-only data, so LML should be a little less demanding. Beta 8 highlights This version adds a few new features such as allowing you to override the _manifest.ymf and _cache.ych files found in RPFs. Support to replace hashed files has also improved and now includes ymaps among other file types. The streaming folder now loads pso files, such as ymap, as text files, too. Most data files that are forced to be loaded as pso by the game have been patched to support being loaded as text files, such as cameras.ymt or the archetype definitions. Due to heavy refactoring to improve startup performance, previous builds are still made available. See changelog for more details. Ymap & Ytyp support (beta 7) This version introduces experimental support for ymap and ytyp. Two very simple examples are included that move some of the blue barrels around Valentine (check behind the saloon) via a different ymap and that make the lights inside the Saloon much brighter (ytyp - thanks to Modifiver). For ymap modifications, if you unload the imap via script and modify the file on disk, the changes will be applied on reload so no need to restart the game. Bk2 support (beta 7) Bink files were technically already supported in previous versions but caused some problems. In the current version they still behave somewhat differently in that they need to have two '.' in their file name as the extension '.bk2' is part of the actual file name. So name your file "movie.bk2.bk2" to make sure it gets replaced correctly. An example for replace would be "replace\movies_0\movies\filename.bk2.bk2". Settings file (beta 7) A settings file has been added that is to be placed in the game's root folder and called lml.ini. It is mostly geared towards developers and allows for more verbose logging output (or less..) making it easier to identify files you want to replace. If you set the log level to 0 you can see most of the game's requests to load files and it should be much easier to correctly identify the path you want to replace. Please note that many files are only loaded via hash and not via their name. You can also choose to disable the streaming and replace folders if you do not use them for added performance. Ymt support (beta 5) The biggest new feature in this update is the support for ymt file editing even if the source file contains unknown hashes. In order to replace a file, export the ymt to xml with OpenIV and then either use replacement via install.xml or the replace folder to replace the original file. Since you are replacing the ymt file, make sure that your file also has the ymt extension even though it contains xml. For the replace folder method you also need to match the file name. Now you can edit the file in plaintext and the game will treat it as a ymt with all names fixed up when loading. See the included examples for more information. If you do end up finding a file where you feel that it is not properly fixed up by LML (for instance when exporting the file directly from OpenIV without any changes breaks the game), please let me know. The only file I know of that will currently cause problems is weapons.ymt, but this is not due to LML but because of an export bug in OpenIV which cuts off certain weapon flags. The High-Roller revolver example has these flags manually restored and hence works fine, but this is not the case when exported directly from OpenIV. I have notified the team and trust that they will fix this export problem in the future. Until then you will have to manually inspect the ymt, gather the flags and restore them manually in the xml for weapons if you plan to use them. Please note that this requires advanced knowledge of game structures. Ymt Examples This download comes with extensive examples courtesy of @Modifiver that modify various aspects of the game. Check them out in the included examples folder and copy them to your lml folder to try them out! Upgrading from earlier LML versions without install.xml support (beta 2 and earlier) This version of Lenny's Mod Loader introduces install.xml files to instruct LML on how to load your mods. Thus, mods can be separated in folders and no longer require nested folder structures. This is a proven concept from our GTA V version and has now been ported over. You can still use the replace and stream folder under your lml folder. Please note, however, that the Mod Manager UI will only pick up mods that use the new install.xml system so it is recommended to convert your mods to the new system. Only mods using install.xml support Download with Mod Manager. Consult the examples below to learn how to use the new system. Examples You can find more examples by @Modifiver here: https://www.rdr2mods.com/downloads/rdr2/mods/80-modifivers-six-shooter-teaser-pack/ More examples with detailed documentation on the new install.xml system can be found here: https://www.rdr2mods.com/downloads/rdr2/mods/77-examples-for-lennys-mod-loader/ Verify your file got replaced If you feel that your file is not being replaced properly, have a look at the log file and see if you can find any entry related to it. Perhaps the path was not correct and hence it did not work. Search for "replaced" for files in replace and "adding" for files in stream. Support Since this is the first release for RDR I expect there to be quite a few problems and certain files might not work as expected. If you have trouble replacing specific files, please do not hesitate to comment here or reach out and include your modified file and file structure so I can have a look. Installation Video Please find a detailed installation video including a guide through our examples here (thanks to @Gan Ceann) Detailed explanation of stream vs replace (older versions) In the lml folder you can find two subfolders, one called "replace" and one called "stream". Both can be used for the same thing but replace is ultimately more powerful, but also more advanced. The stream folder you might recognize from Map Editor or Rampage Trainer and just loads streaming files directly. Stream As mentioned, similar to other tools available this merely loads streaming files into the game when the game is loading. For instance, model or texture files would go in there and will replace the existing assets in the game. If you do not know the name of an asset, but only its hash, simply name it 0xhash.ext (e.g. 0x9E54B506.ytd for w_melee_machete01+hi.ytd) and it will still be recognized and replace the asset correctly. This is the most convenient way to quickly replace streaming files as you do not have to worry about where in the game files they are located but only their name. Replace This folder creates a virtual mapping of the entire game file structure and hence allows you to replace any game file, granted you know its full location. This is similar to the paths you can see in OpenIV when navigating RPFs, but not exactly the same. If you want to change the dispatch.meta file for instance, you will need to modify it in update.rpf, as the one in common.rpf is superseded by that. To do that, you would create the following structure: "replace\update\common\data\dispatch.meta". This is exactly the path you would use in OpenIV (without the .rpf ending for update). Now, whenever the game wants to access this file, it will load yours instead. It is that simple! If you want to replace the font file font_lib_efigs.gfx in scaleform_frontend.rpf for instance, you would create the following structure: "replace\update\x64\patch\data\cdimages\scaleform_frontend\font_lib_efigs.gfx". Word of caution: File paths do not always match their RPF names unfortunately, hence this is a bit more advanced but also allows greater control. Say you want to replace player_zero_coat_001_open.ydd which is present in both packs_1.rpf (original) and dlc.rpf (from patchpack001, an update to the file). Files DLCs follow a slightly different pathing scheme. The full path to this file would be "replace\dlc_patchPack001\x64\packs\base\models\component_models\player_zero_coat_001_open.ydd". As you can see, it does not match the file path directly, which is also why for many files using the stream folder is just simpler. This is because the game maps some files differently and when you open the dlc.rpf (in patchpack001) and its setup2.xml you will see why: the device name is dlc_patchPack001 which is the "root" of all files inside this archive. Thus the path starts at "dlc_patchPack001" and then follows the RPF structure until you arrive at "replace\dlc_patchPack001\x64\packs\base\models\component_models\player_zero_coat_001_open.ydd". Not that complicated, but certainly not as easy as the streaming folder and something to look out for. Acknowledgements Thanks to NTA for his work on fwEvents, hooking, fiDevice and sysAllocator Thanks to listener for his work on fiDevice and advice over the years (hope you are well!) Thanks to the OpenIV team for OpenIV Thanks to dexyfex for CodeWalker Thanks to Gan Ceann, Will and GameRoll for testing as well as Jewels, GuiCORLEONEx794, jack.sharif and Modifiver for providing example assets2 points
 -
1 point
 This software has currently two main tools: Simple XML to YMT format: Converts a rampage outfit into a format readable in a ymt file PED Editor: Read all outfits slots from a Ped and helps to rearrange, delete, or add new outfits in the list WARNING: Always make backups of the files you are working with, unless you know what you are doing, if you delete all the outfits you need to start again, currently there is no way to create outfits from zero WARNING 2: Its likely your Antivirus, Firewall, Defender, or Browser could flag this file as dangerous, that's a false positive, Its not because the file is dangerous, Its because I suck at programming. Give it a try, it would save you a lot of time, its pretty simple so there is no much to learn about it, I want to keep updating it, fixing it, and hear your recommendations.1 point
 -
1 point
 Dive, Crawl & Gun [Diving] - You can dive to go prone and start crawling. - You can aim and shoot while diving before you start ragdolling. [This is important, don't except something like Max Payne 3 shoot dodge system. You can only shoot for a little time period before you ragdoll] - You can also enable your dead eye while diving to shoot your targets. - Rifles, pistols and fists have their unique diving animations and you can dive to 4 directions. I'm planning to improve this diving feature. I'll probably start by making jumps pushing player more forward. [Crawling]- Makes you less visible and more unlikely to be noticed.- Crawling includes most of animations of the unused crawling move set. -Included animations are:idle - idle turn left 90 degrees - idle turn right -90 degrees - idle turn left 180 degrees - idle turn right -180 degrees | walk - walk backwards - left walk start - right walk start - walk left - walk right | run - run right - run left. - You can aim and shoot all of your guns while prone. You can also switch between your weapons and use scope of your weapon. - If you crawl under water you'll start losing your stamina. - You'll get up to crouch position and won't lose your stealth status. [Crawl to Sitting] - You can also go from prone to a sitting position and fire your weapons like that. - Rifle and pistols have different animations for this position. [Stealth Mode] - Stealth noise is reduced. - You can also go into stealth mode, instead of crouching. Takedowns look better in this mod since the player doesn't have to get up from crouching. [General Controls] Hold CTRL / L3 = Go Prone Double tap Z / R3 = To enter stealth mode | Tap once to exit stealth mode G / Hold △ / Ⓨ = Dive to prone CTRL / L3 = Exit prone, stealth mode, or sitting Regular combat controls to, aim, shoot and switch weapons. [Crawl Idle Controls] A / Move Left Stick Left = 90 degree idle turn to left D / Move Left Stick Right = -90 degree idle turn to left Shift / Ⓧ / Ⓐ Move Left Stick Left = 180 degree idle turn to left Shift / Ⓧ / Ⓐ Move Left Stick Right = -180 degree idle turn to left W+A / Hold Left Stick Diagonally Left = 90 degree turn left start. W+D / Hold Left Stick Diagonally Right = -90 degree turn right start. G / RB / RT = Switch to sitting position. [Crawl Controls] W / Hold Left Stick Forward = Crawl W / Hold Left Stick Right = Right turn W / Hold Left Stick Left = Left Turn S / Hold Left Stick Backwards = Crawl backwards W + Shift / Ⓧ / Ⓐ / Hold Left Stick Forward = Fast crawl forward W + Shift / Ⓧ / Ⓐ / Hold Left Stick Left = Fast crawl to left W + Shift / Ⓧ / Ⓐ / Hold Left Stick Right = Fast crawl to right [Config File] StealthModeEnabled=1 DivingOnly=0 [Controls - Keyboard] ProneInputKeyboard=INPUT_DUCK StealthInputKeyboard=INPUT_FRONTEND_LS DiveInputKeyboard=INPUT_INTERACT_LOCKON_ANIMAL SwitchToSitInputKeyboard=INPUT_INTERACT_LOCKON_ANIMAL [Controls - Controller] ProneInputController=INPUT_DUCK StealthInputController=INPUT_LOOK_BEHIND DiveInputController=INPUT_MELEE_GRAPPLE SwitchToSitInputController=INPUT_COVER1 point
 -
1 point
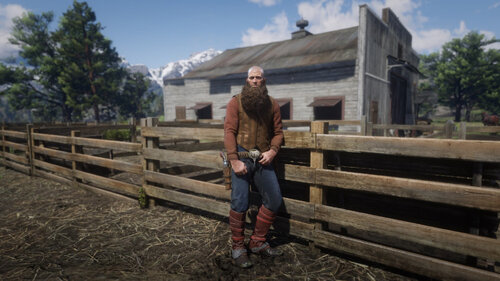 We are proud to release our latest modification for Red Dead Redemption 2: An outfit changer! Featuring all of the more than 1300 single player clothing items (and in version 0.2 all multiplayer components!), Arthur has never looked more unique. A word of caution: The component system in RDR2 is very powerful and even many parts of your skin are components which you might need to toggle to make body parts (re)appear! Please read the readme.txt file for more information on how the system works. Features Change clothing items in over 40 categories with over 10000 total variations! Save your current outfit Quickly equip saved outfits Reset all your components Change Ped Skin (see readme) Enable Multiplayer Assets (try changing your model to mp_male or mp_female using our trainer to access them in all your glory) New! Change beard and hair length, untuck shirts and much more! New! Customize menu key Controls Press F2 to open/close the Outfit Changer menu: Up/Down to navigate the menu vertically. Left/Right to change item options. Enter to select. Backspace to go back. Installation All you need to do is drag the files into your game root folder - the one where RDR 2 is installed. The Outfit Changer is loaded from the same folder and shares many of the same files as Lenny's Simple Trainer but works without it. When the game launches, you should hear a few beeping sounds, indicating that the mod is loaded. RDR Online is not supported for modding. Don't attempt to play Online with this mod. Remove all files from your game folder before playing Online. Configuration Open the outfitchanger.ini file (found in your game folder) in a text editor to configure the Outfit Changer where you can: Change the names of categories. Name your favourite clothing items to make finding them again easier. Manually edit/manage your saved outfits (although you can do this in the menu). We are working on a Wiki page to document all of the clothing items. To load any changes to the outfitchanger.ini file, use the "Reload Settings" feature in the menu. Please don't upload or redistribute this mod, link here instead so that everyone has the most up to date version. Please note that you are not permitted to sell configuration files for this mod. This mod is free and so should be your files!1 point
 -
1 point
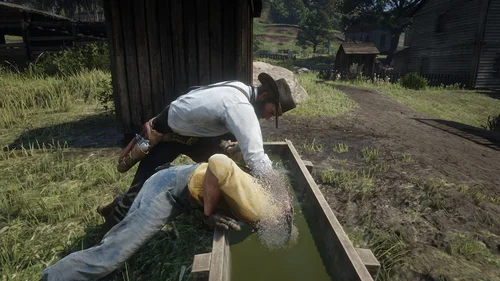 [Controls] TAB/LB/LT = Start Drowning action Hold / E / △ / Ⓨ = Drown F / Ⓞ / Ⓑ = Quick dunk and release R / □ / ✕ = Quick dunk and release [Features] - Drown prompt appears near a trough. - The drowning action can play all of the troughs you can find around the world. - You can start this action from both sides of the trough. - Water splash effects, and drowning sound is added. - Dismissing the enemy puts them into the intimidated state. [Issues] - Placement can look off depending on when you pressed the button. - The entry animation Rockstar left in the game was broken. Because of that I used a custom animation. - If you start the trough action and don't press a button you'll see that players looks in a other directions. However, when you press one of the action buttons this will be fixed.1 point
 -
1 point
 Lenny's Simple Trainer is a mod for Red Dead Redemption II that lets you do a bunch of awesome things in RDR 2, including clear your current wanted level, give yourself money, and much more. If you've ever wanted to play as a wolf, soar in the skies as an eagle or have a personal bodyguard, then this is the mod for you. If upgrading from a previous version, always use the new lst.ini file. Features Play as any character model and easily switch between your favourites. Teleport to anywhere on the map, including your current waypoint. Nudge yourself forward through locked doors and walls. Change & pause the time of day. Change & freeze the weather. Give yourself any weapon in the game! Clear your wanted level. Never wanted setting. Toggle godmode on or off. Give yourself unlimited amounts of money! Change the game's timecycle speed. Quickly spawn a new horse to use. Spawn any wagon, coach, vehicle, etc. in the game. Speed up and slow down the game's time scale (slow motion!) Spawn an unlimited number of bodyguards! Command your bodyguards to attack people all at once. Make any ped enter or leave your vehicle (you can fill entire wagons!) Exploding, incendiary and super explosive ammo! Super Godmode - protects against ragdoll too. All settings can now be reloaded while in-game. Scaling options - play as tiny or giant characters! Call in a deadly flying eagle to rain death from above! Play hundreds of player actions and scenarios like swinging pickaxes! Choose gender when spawning horses! Change player gender when playing as an animal Option to disable the sniper in New Austin Always get perfect pelts when skinning Make your horse invincible, enable unlimited stamina and change horse gender on the fly Enable unlimited stamina and dead eye for the player Drop your current weapon Freeze weather and time Set formations for your bodyguards Make your bodyguards lasso people! Configure bodyguard control keys Instantly reveal the whole game map Instantly bond with your horse Change weapon damage Enable unlimited items Make bodyguards invincible (god mode) and explosion proof (super god mode) Make bodyguards hold their position Increase honor, decrease honor, set to min and max Freeze spawned peds in place Keep your changed model and outfits when replaying story missions (experimental - does not work for all missions and outfits yet)! Bond with gang horses Spawn legendary animals Select outfit for newly spawned peds Load multiplayer only weapons, such as the Navy Revolver (Set LoadMPWeapons to true in the ini, please note that this can cause severe side effects due to how we hack in the weapons) Select outfit for bodyguards New! Change amount of money to receive New! MP models work again (big thanks to deterministic_bubble)! Controls F5: PRESS to open or close the Trainer Menu. F11: PRESS to teleport to waypoint. F12: Log your current position (and some other info) to the logfile. Also works on peds/entites you target. NumPad 0: HOLD and PRESS Left/Right/Up/Down/PgUp/PgDn to nudge the player, forward, up, left, backwards, etc. Go through doors with this. Menu controls: Up/Down to navigate the menu vertically. Left/Right to change item options. Enter to select an option. Backspace to return to the previous page. Bodyguard controls: Hold and Release F9 to make your bodyguards regroup with you. Hold F9 to dismiss all of your bodyguards. Aim at a Ped and Press 1 to make all bodyguards attack them. Aim at a Ped and Press 2 to make the closest bodyguard attack them. Aim at a Ped and Press 3 to make the closest bodyguard lasso them. Aim at a Ped and Press 4 to make them enter your vehicle. Press 5 to make your bodyguards hold their current position. Eagle gunship controls: Aim at a Ped and Press F8 to make the eagle attack them. Installation All you need to do is drag the files into your game root folder - the one where RDR 2 is installed. When the game launches, you should hear a few beeping sounds, indicating that the trainer is loaded. Do not attempt to play Online with this trainer. Remove all files from your game folder before playing Online. Do not save your game as a changed character model. We recommend that you disable autosaves before using this trainer. Configuration Character models, bodyguard models, weapon models, settings and teleport positions can be customized in the lst.ini file while the game is running: For a list of character models check: https://www.mod-rdr.com/wiki/list-of-rdr2-ped-models/ For a list of weapon models check: https://www.mod-rdr.com/wiki/list-of-rdr2-weapon-models/ For a list of teleport coordinates: https://www.mod-rdr.com/wiki/list-of-rdr2-teleports/ For a list of vehicle models check: https://www.mod-rdr.com/wiki/list-of-rdr2-vehicle-models/ For a list of player actions check: https://www.mod-rdr.com/wiki/list-of-rdr2-scenarios/ Troubleshooting If you are having trouble running Lenny's Simple Trainer, please check the log file. If you see "System.OutOfMemoryException: STATUS_NO_MEMORY: Failed to allocate memory", please download this fix to your game root directory: www.mod-rdr.com/EasyHookPatch.zip If you do not get a logfile, please launch the game as administrator and make sure the folder is writable! Please don't upload or redistribute this mod, link here instead so that everyone has the most up to date version.1 point
 -
1 point
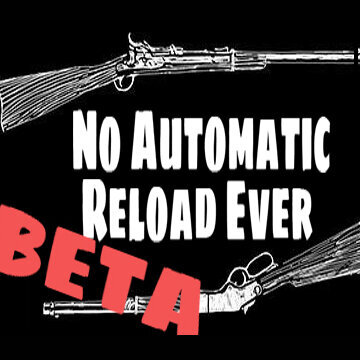 This mod attempts to prevent weapons from being automatically reloaded while they're holstered/stored, when activating deadeye or when they're empty. This mod has three main parts: 1. No automatic reload when using deadeye. 2. No automatic reload while weapons are holstered or stored on your horse. The mod remembers the last five weapons you equipped of each type (last 5 revolvers, last 5 pistols, etc...) and keeps track of their ammo count. Known issues: -Dual wielding two of the exact same weapons will make one of them reload, the mod can only track one of each weapon. I don't think this can be fixed with the tools available to us right now.. -Doesn't work with the LeMat revolver. 3. No automatic reload when a gun is empty. This is the messy part, you can disable this in the .ini if you'd like to use the rest of the features without this one... The game's ammo counter will display incorrect numbers, that's part of the trick I use to prevent auto reload and not likely to be fixed. To circumvent this I made my own ammo counter, unfortunately it can only display ammo that's currently in your guns, and not the overall amount in your inventory.. (check out the image to see how it looks). You can disable my ammo counter in the .ini, but if you decide to use it you have to disable the vanilla ammo counter in the game's settings. Other known issues: -The ammo counter will possibly be positioned incorrectly depending on the resolution / aspect ratio of your monitor. You can correct it for yourself in the .ini file. -For now single shot rifles will auto reload, I'm yet to look into those. -Does not work correctly with the Mauser pistol, the LeMat revolver and John's Cattleman revolver. -When you completely run out of a certain type of ammo the last bullet might get stuck in your gun. Holstering and re-equipping the gun should solve this. -I haven't tested it with exotic or gang weapons (let alone mod weapons..). Installation: Download NoAutomaticReloadEver.rar, extract it and drop the files into you Red Dead Redemption 2 game folder. You're going to need Script Hook By Alexander Blade.1 point
 -
1 point
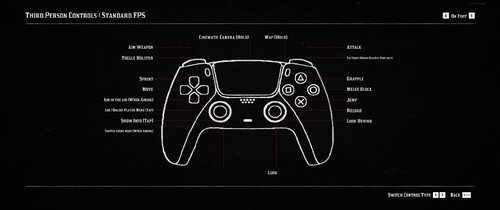 This is simply a reupload of my mod from Nexus. If you've already downloaded this from there, you don't need this version; it's the same. Only uploading to make installing using mod manager easier. Overview Red Dead Redemption 2 is supposed to have native support for PlayStation controllers and while it does, it's not perfect. Vibration doesn't work and if you use a different controller configuration on steam, you are back to Xbox button prompts. This mod simply replaces the Xbox icons in the game files with PlayStation icons, basically forcing the game to show the correct prompts. Installation Mod Manager Click the download with mod manager button and enable it. Manual Simply copy the folder "lml" into your root directory. As long as you have Lenny's Mod Loader installed, it will already been set up and you just need to drag & drop it in. That's it. *Either option both require Lenny's Mod Loader and Scipthook!! Link to Lenny's Mod Loader Link to Scripthook1 point
