


259 files (128 files filtered)
-
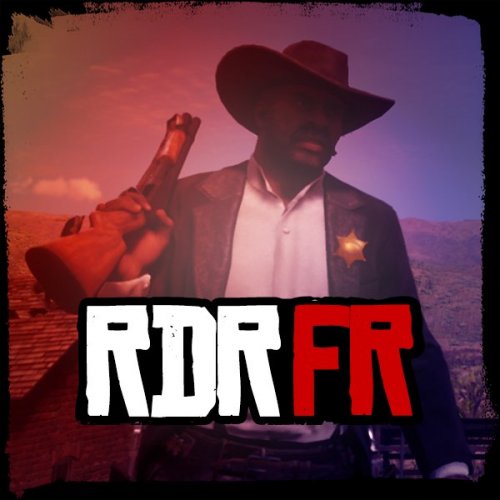 Shoot it out with bandits, hunt down outlaws and walk the streets with a star. RDR First Response (RDRFR) is an all new experience we've created specifically tailored for Red Dead Redemption which ties in seamlessly with the game, turning you into the law.
This first version of RDRFR puts the power of the law into your hands for the first time since Rockstar's flagship title arrived on PC. Working in conjunction with our Patreon supporters and testers, we've built a number of core features into the mod for you to enjoy with the ability to arrest suspects, go on duty and request backup in a manner similar to LSPDFR for GTA V.
Being tailor made towards RDR, though, there's a couple of key differences in RDRFR. One of the new concepts we've introduced is for providing 'missions' or 'investigations' to the player. Instead of pretending that police radios existed in the 20th Century, you'll now find that civilians within the world will summon your help the old fashioned way - in person, calling out loudly for the assistance of the law. Similarly, there are other noticeable deviations throughout especially as it relates to arresting suspects and the interaction options available. Instead of having separate key presses or buttons, we've tried to keep things as integrated with the game as possible: most of the features and actions in RDRFR are accessed or performed through the game's contextual prompts.
Part of the First Response Mods family.
RDRFR Feature Guide
More information about the features available in RDRFR.
View the RDRFR Feature Guide Installation Help & FAQ
An online guide and tutorial video for getting started with RDRFR.
RDRFR FAQ RDRFR Installation Guide
Want to discuss RDRFR? Check out the RDRFR Forums Section here: https://www.mod-rdr.com/forums/forum/6-rdr-first-response/
-
 Description
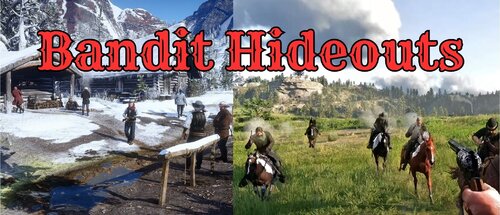
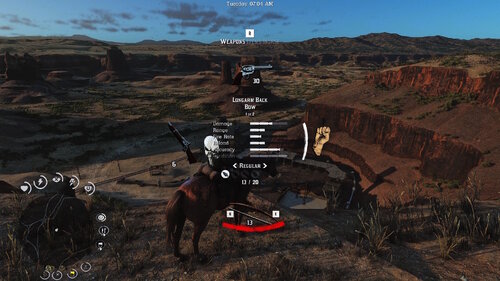
The mod adds 141 new bandit hideouts, 50 ambush points, a bandit posse on horseback that will chase and hunt you,
random roaming bandits on foot, horse, or wagon. Hire up to 9 gunmen at saloons, and fight against zombies.
Players can customize all features through various settings with the included Bandit_Hideouts.ini file.
Bandit Hideouts is a standalone mod, it is a highly upgraded version of all the AMJM Transport mod bandit features,
created by crossed99 and Gunter Severloh
//////////////////////////////////////////////////////////////////////////////////////////////////////////////////////
Warning - Before you install!
For those installing the mod for the first time and want to also play the story/missions.
So you understand what this mod does, it adds 141 bandit hideouts and
50 ambush points all over the map, thats everywhere and anywhere except towns (settlements).
That means there are some hideouts that will spawn at story, and mission
locations. There are also ambush points that will spawn bandits that may
interfere with story missions, or while riding to them.
There are also other bandit features like the bandit posse on horseback
that will spawn and attack the player anywhere, anytime.
That means they may come when your in the middle of a story mission, or traveling
with another character from the story during a mission.
If you do play the story and dont like the idea of hideouts, and bandits interfering
during the story and missions.
There is a Bandit_Hideouts.ini file included in the download, it is a configuration file that will
allow you to configure every feature in the mod, this includes being able to disable the mod while ingame,
or disabling certain features, hideouts, and ambush points that could interfere with the story.
As said everything in the mod is configurable, it can be enabled, disabled, or adjusted if it uses numbers.
Do not install the mod if you are not at least in chapter 2 of the story!
Any questions or problems review the articles, or ask on the post tab!
/////////////////////////////////////////////////////////////////////////////////////////////////////////////////////////////////
Features
Bandit Hideouts
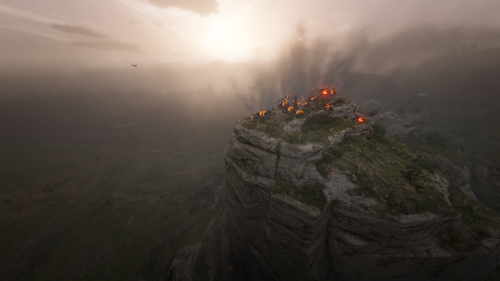
The Bandit Hideouts mod adds many new hideouts across the RDR2 map for the player to discover and clear out.
Each hideout ranges in the number of bandits, but you can define in the ini of the mod how many bandits
a hideout will have, what gang will spawn there, and how many reinforcements will come if any,
even if zombies will spawn there instead of bandits.
Hideout Locations Map
The hideout locations map is a high resolution map of the RDR2 world you can download and use it as a reference to
see where all the hideouts, & ambush locations are at in the world.
The legend on the map will tell you what region a hideout or ambush location is in, what gang is at each hideout/ambush
point. All hideouts and ambush points are marked with a colored skull icon to represent a hideout, and an X to represent an ambush location,
both a numbered and listed in the legend accordingly. Icons on the map will indicate their exact locations.
Download
Google Drive: 59.5mb https://drive.google.com/drive/folders/1iLI3Yjmay0uw22f-0MUg0j0__DAEYlGK?usp=sharing
Credits: LittleBigSmoak & Moth-man
Ingame Blips & Icons
Hideout Locations Blip (icon)
A blip (icon) of a house with a skull inside it, will show up at the bottom left corner of your screen
it means a hideout has spawned in and is nearby.
If you pass by a hideout without attacking it, the map blip (icon) will disappear once your out of range of the hideout.
If you attack and clear the hideout then the blip on the map will be removed and your screen until the hideout timer is up.
You can disable this icon if you wish through the included bandit hideouts.ini
Default spawned in hideout map blip
When a hideout spawns in, by default this icon will be showing on the map at the location of the hideout,
the player has 3 other choices of map icons they can use if they want to change it which can be done through the ini
Persistent Blip (icon)
The Persistent blip icon will show on every hideout location on the map whether your near a hideout or not,
if you clear a hideout the blip icon on the map will be removed until the spawn time for that hideout has returned.
The persistent blip icons have their own icon type vs the one on screen. The icon can also be disabled in the ini, and
only the blip icon of a hideout will show on the map when the hideout spawns in.
Types of bandit hideouts
Each bandit hideout can be a house, camp, cabin, abandoned building, cave, mine, fort, ruin, and other places.
Hideouts will spawn bandits in by chance when you're nearby, this means that if set in the Bandit Hideouts.ini
you set the chance to 100 then each time you come close to an area where a hideout would be then bandits
will spawn there for sure, the lower the chance then it becomes random or less.
Cleared hideout message
A small feature by default is if you cleared a hideout a message will show on the screen saying
"You have cleared the hideout!"
you can disable this in the ini if you wish.
Earn money from clearing hideouts!
Yes you read that right, after killing all the bandits in a hideout, you will earn a random
amount of money ranging from $25 - $150
You can customize the amount you want to earn in the ini or set it to 0 to disable it.
Cleared hideout respawn
Once you clear a hideout you can set in the ini the cool down of how long before they respawn again.
If you set the respawn to 1 for example then in one hour from when you cleared the hideout bandits will spawn in again.
Hideout bandit/gang types
Each hideout will be populated with gang members for the area the hideout is in, for example:
Valentine area will have O'Driscoll members or a generic gang.
Lemoyne/ Rhodes area will have Lemoyne Raiders, and a generic gang.
Annesburg area will have Murfree gang members.
Saint Denis area may have either Nightfolk, or a generic gang.
Tall Trees area you will see the Skinner brothers gang.
New Austin area you will see the Del Lobo gang.
Grizzlies West (snow region) area will have a generic gang.
Grizzlies East (snow region) area will have a generic gang.
Guarma will have the Cuban Army and Nightfolk.
Disable individual Hideouts and Ambush points
This feature allows the player to disable any individual hideout and ambush point in the mod through the included ini
all you need to do is locate the hideout you want to disable through the downloadable map and then change the number from a 1 to a 0.
There is a list for both hideouts and ambush points in the ini.
Custom Gangs in hideouts
Each hideout listed in the ini for the Disable Individual Hideouts list can either be disabled, or changed so it spawns another gang.
The gang types to choose from are the following:
// Gang Type Reference //
Generic gang - 7
Murfree Brood - 8
Lemoyne Raiders - 9
O'Driscoll Boys - 10
Skinner Brothers - 11
Del Lobo gang - 12
Nightfolk -13
Cuban Army -14
Ku Klux Klan - 15
Wapiti Warriors - 16
United States Army - 17
Laramie gang - 18
Micah's gang - 19
Angelo Bronte's Mob - 20
Cornwall Goons - 21
Braithwaites - 22
Gray Family - 23
Foreman Brothers - 24
Bounty Hunters - 25
Pinkertons National Detective Agency - 26
Chelonians - 27
Vampires - 28
James Langton Boys - 29
Here is an example hideout in the ini that is listed in the Disable Individual Hideouts list:
ENABLE_ABANDONED_FACTORY=1
- With the setting at 1 the hideout spawns its default gang.
- With its setting at 0 the hideout is disabled and wont spawn.
- If the number is changed to a number from either 7-28 seen in the list above, then that hideout will spawn that gang based on the number.
For example if we changed the number to say
ENABLE_ABANDONED_FACTORY=18
then the Laramies gang will spawn at that hideout instead of the default gang.
Here is an article on how this works in more detail with a video demonstration/guide
https://www.nexusmods.com/reddeadredemption2/articles/435
Custom Gangs in Regions
A feature where you can define what gangs will spawn in what regions for hideouts, a list in the ini of all the regions
or areas on the map, each region has a default number, the number represents what gang will spawn in that region.
From the reference in the ini, you can change the number for the region for whatever gang you want to
spawn at the hideouts in those regions. This feature is disabled by default.
Exact or random number of bandits in a hideout
The amount of bandits you can encounter in a hideout will be defined in the Bandit Hideouts.ini
there you can set the minimum and maximum numbers you will encounter, this is for all hideouts.
If you set the number for both min/max the same you will get that exact amount, if you set the number to
exceed the default random min and max then the extra bandits will come as reinforcements.
Bandit Reinforcements
Bandits at hideouts can call in reinforcements, they will show up on horses and or on foot.
Reinforcements is set by chance in the ini, the higher the percentage (chance) then reinforcements will show.
Reinforcements also has a setting where you can define how many bandits will come, and if you only wanted
bandits on horses, or foot, or both, you also can disable reinforcements from coming in the ini.
Bandit Spawn Amount
In the included bandit hideouts.ini there is a list called spawn amount, this list will list every hideout/ambush point
and allow you to set a specific number that you want to spawn at a or each individual hideout.
This lets you customize hideouts based on how you want to play.
Each hideout and ambush point has a default or base number of spawn points you can use this article reference
to get the base default number of each hideout: LINK
Knowing the base number of a hideout or ambush point will tell you how many bandits can be spawned there.
For example: If you chose a hideout that had 10 bandits spawn positions that means if you set the spawn amount
to say 5 then only 5 bandits would spawn. If you set the number to say 15 then the extra 5 bandits would spawn
at the reinforcement spawn points.
The would respawn at the reinforcement spawn points because there are only 10 available spawn points
at the hideout. The same applies to ambush points.
Bandits will chase the player
Bandits will chase you if you ride off or run away after attacking their hideout.
Bandit Ambushes
Ambushes are not dynamic they are built the same as hideouts and are at set locations.
Each ambush location can vary between 2-6 bandits that will attack you on foot if you enter an ambush location.
If you run away on foot or on horse the bandits at the ambush location will chase after you either on foot or get on a horse.
Ambush locations are marked on the downloadable map with an X
Enable/Disable individual Ambush Points
This feature introduced in v1.18 gives the player the option to enable or disable an individual ambush location through the included ini,
all you need to do is refer to the map linked for download and decide which ambush location you want to disable for whatever reason,
you open up the ini file, locate the ambush point in the list, and just set the setting accordingly.
Ambushes can also be customized to have a certain amount of bandits spawn using the spawn amount setting.
Bandit Posse on Horseback
As players explore the game world, they will randomly be attacked by bandits on horseback, these encounters can happen at any time.
In the Bandit Hideouts.ini you can define how often (how many ingame hrs) bandits will attack,
and a minimum and maximum number of bandits on horseback that will attack, you can disable this feature in the ini if you want to.
Random Roaming Bandits
Bandits roaming the world, they will spawn in the area you are in and will be bandit/gang members
from that area so if your in Valentine Area then you might see a small group of O'Driscolls wandering around.
These bandits may be on foot, on horseback alone, in a group, or on a wagon, or both.
You can also set in the ini if they attack you on sight or not, and set how often they will spawn.
Hired Gunmen
Players can hire up to 9 gunmen to fight alongside them, to do so just talk to the barkeep in any saloon.
These hired guns will assist the player in combat, making it easier to take on large groups of bandits or zombies.
You can hire up to 9 gunmen at a time.
You can hire a random gunmen with their own gear and weapons.
You can customize what they wear, and the weapons they carry.
Set how much it costs to hire a gunmen.
Hired Guns will not fight while in a town (can change this in the ini).
Story characters are also available.
You can use the 'Rest & Recover' option in the menu that will teleport your hired guns to you in case
you got separated, they'll be cleaned and their hats and weapons will be recovered if they lost them.
They automatically go into "sneak and hold fire" mode while you're crouching / sneaking outside of combat.
If the "Allow revive" option is enabled, instead of dying they will go down into an injured state and be revived
by crouching close to their head until the 'Help' prompt fills up (10 seconds).
Using the 'Wait for signal' command will make them stay and don't do anything until you signal to them by whistling.
The 'Ride with me' command will prevent them from spawning in their own horse.
If there's another free horse around they'll use that, but if not they'll ride with you on your horse.
Commands menu:
You can also give commands to them through their command menu, Numpad 1-9 keys by default.
Hired Gunmen Voice Lines
When you tell your hired gunmen to stay or follow, Arthur or John will actually say out loud those commands,
and when your crouched and you tell your gunmen to stay Arthur or John will say it in a quiet voice.
This feature can also be enabled and disabled in the ini, and is enabled by default.
The command menu has some extra commands:
Aim at person while the menu is up: Attack target, lasso target.
Aim at dead / hogtied person: pick up target.
Aim at horse: put carried body on horse.
Aim at downed hired gun: help up (it'll take them the same amount of time as for you).
Press numpad 0 to make all hired guns stay / follow
Zombies
As if bandits weren't enough to deal with, the mod also adds zombies to the game world.
Disabled by default, you can enable them in the Bandit Hideouts.ini
These are the options in the ini you can customize :
Spawn frequency - this is how much more or less you will see of them.
Day/night detection - this is a setting where you can set if the zombies detect you.
Zombie health - this is how much a zombie can take before you kill them.
Min/max spawn amount - this will be the group size of how many groups of zombies.
Min/max number - number of zombies that can spawn during day or night.
Min/max spawn time - how often they will spawn in seconds.
Zombies burst into flames upon dieing.
Zombie lairs - this will change all the bandit hideouts to zombie lairs,
so instead of bandits spawning, zombies will.
Customization
All of the features in the mod can be customized by editing the Bandit Hideouts.ini file.
Each setting in the ini has a description on what it does and how to enable/disable it or adjust it.
Open the ini file with notepad to edit it, also run it as administrator if you are being denied access.
Installation
Move the following files:
Bandit_Hideouts.asi
Bandit_Hideouts.ini
Bandit_Hideouts_CustomPeds.txt
to your RDR2 directory which can be found here:
C:\SteamLibrary\steamapps\common\Red Dead Redemption 2
Requirements
Scripthook by Alexander Blade is required to run the mod.
https://www.dev-c.com/rdr2/scripthookrdr2/
If AB Scripthook gives you issues with the mod then try using
ScriptHookRDR2 V2
https://www.nexusmods.com/reddeadredemption2/mods/1472
Credits
Crossed99 for his help and support, and patience in helping me create and update this version of his great mod!
LittleBigSmoak & Moth-man for their help in creating the Bandit Hideouts map showing all the locations
of the hideouts, and sorting them based on color and gang.
Bandit Hideouts Youtube Channel
Gunter Severloh RDR2
Check out the Bandit Hideouts Youtube Channel for gameplay, guides and how to videos on the mod.- 53,898 Downloads
- 324088 Views
- 27.04 MB File Size
- 34 Comments
Updated -
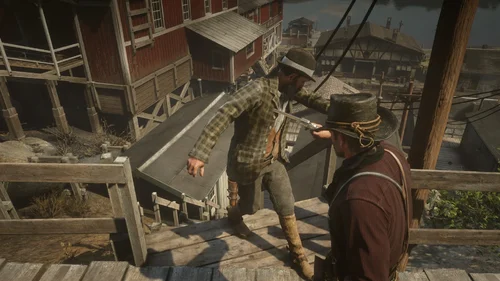
 🎉 Saddle up, lawmen! Introducing RDRFR: Unleashed, my brand-new mod for Red Dead Redemption 2 that lets you patrol the entire map! With this mod, you can live out your Wild West sheriff dreams like never before.
🌟 Key Features:
- Free Roam as an Officer: You patrol is no longer limited to towns.
- You can now patrol the vast open world of RDR2 with the full RDRFR experience!
INSTRUCTIONS:
1. Ensure you already have RDRFR installed!
2. After you download the file, open the contents of the zip file, and place in MAIN DIRECTORY of RDR2. If you already have RDRFR installed it will be automatically be placed in the correct folder.
HOW TO PERSONALIZE YOUR BADGE?
-📍Go to: Red Dead Redemption 2\rdrfr\plugins\OfficerOverlay.ini, and open the .ini. The default is SheriffName=Arthur "Justice" Morgan. Change the text after the = sign to whatever you like.
🎮 How to Get Started:
1. Start the game.
2. Once in game, start your RAGE Plugin Hook for RDR2, and ensure it loads.
3. Head to any police station in-game, and go on duty.
4. You'll known when the mod is working as you'll see your custom badge in the upper left corner and an onscreen message at the bottom center to confirm the mod is active!
✅🔥 Get ready to enforce justice across the frontier with RDRFR: Unleashed!
Download the mod. Don’t forget to like, subscribe, and hit that bell 🔔 for more RDR2 modding content!
Special thanks to Rixus, Rededrunk, somncoitus, for coding inspiration, and the LawLine Discord Team for their dream of improving RDRFR.
Interested in seeing more future RDRFR projects? Please join the LawLine Discord @ https://discord.gg/vC7gs4A5AN.- 91 Downloads
- 1494 Views
- 22.23 kB File Size
Updated -
 Dive, Crawl & Gun
[Diving]
- You can dive to go prone and start crawling.
- You can aim and shoot while diving before you start ragdolling. [This is important, don't except something like Max Payne 3 shoot dodge system. You can only shoot for a little time period before you ragdoll]
- You can also enable your dead eye while diving to shoot your targets.
- Rifles, pistols and fists have their unique diving animations and you can dive to 4 directions.
I'm planning to improve this diving feature. I'll probably start by making jumps pushing player more forward.
[Crawling]- Makes you less visible and more unlikely to be noticed.- Crawling includes most of animations of the unused crawling move set.
-Included animations are:idle - idle turn left 90 degrees - idle turn right -90 degrees - idle turn left 180 degrees - idle turn right -180 degrees | walk - walk backwards - left walk start - right walk start - walk left - walk right | run - run right - run left.
- You can aim and shoot all of your guns while prone. You can also switch between your weapons and use scope of your weapon.
- If you crawl under water you'll start losing your stamina.
- You'll get up to crouch position and won't lose your stealth status.
[Crawl to Sitting]
- You can also go from prone to a sitting position and fire your weapons like that.
- Rifle and pistols have different animations for this position.
[Stealth Mode]
- Stealth noise is reduced.
- You can also go into stealth mode, instead of crouching. Takedowns look better in this mod since the player doesn't have to get up from crouching.
[General Controls]
Hold CTRL / L3 = Go Prone
Double tap Z / R3 = To enter stealth mode | Tap once to exit stealth mode
G / Hold △ / Ⓨ = Dive to prone
CTRL / L3 = Exit prone, stealth mode, or sitting
Regular combat controls to, aim, shoot and switch weapons.
[Crawl Idle Controls]
A / Move Left Stick Left = 90 degree idle turn to left
D / Move Left Stick Right = -90 degree idle turn to left
Shift / Ⓧ / Ⓐ Move Left Stick Left = 180 degree idle turn to left
Shift / Ⓧ / Ⓐ Move Left Stick Right = -180 degree idle turn to left
W+A / Hold Left Stick Diagonally Left = 90 degree turn left start.
W+D / Hold Left Stick Diagonally Right = -90 degree turn right start.
G / RB / RT = Switch to sitting position.
[Crawl Controls]
W / Hold Left Stick Forward = Crawl
W / Hold Left Stick Right = Right turn
W / Hold Left Stick Left = Left Turn
S / Hold Left Stick Backwards = Crawl backwards
W + Shift / Ⓧ / Ⓐ / Hold Left Stick Forward = Fast crawl forward
W + Shift / Ⓧ / Ⓐ / Hold Left Stick Left = Fast crawl to left
W + Shift / Ⓧ / Ⓐ / Hold Left Stick Right = Fast crawl to right
[Config File]
StealthModeEnabled=1
DivingOnly=0
[Controls - Keyboard]
ProneInputKeyboard=INPUT_DUCK
StealthInputKeyboard=INPUT_FRONTEND_LS
DiveInputKeyboard=INPUT_INTERACT_LOCKON_ANIMAL
SwitchToSitInputKeyboard=INPUT_INTERACT_LOCKON_ANIMAL
[Controls - Controller]
ProneInputController=INPUT_DUCK
StealthInputController=INPUT_LOOK_BEHIND
DiveInputController=INPUT_MELEE_GRAPPLE
SwitchToSitInputController=INPUT_COVER -
 26th August 2025 update:
New features
- All the hacky solutions here, but now we explicitly ensure that the AnimScene specific hotkeys below can only be used while in an AnimScene, this addresses a lot of bugs that happened, yay!
- Once an AnimScene finishes, the game now wrestle control back of the camera stuff and resets PostFX, etc, ensuring its nice and stable.
- You can now toggle Freecam or the new PedSnap camera while the perspective is forced without needing to turn it off/on again to make it work.
- Added the ability to toggle a Camera (PedSnap) which selects a character in the AnimScene, showing you the view from their perspective while they look at Arthur, one small note is that because some characters are teleported around it can be a bit janky, but its fun!
---
This mod focuses on trying to do a load of cutscene magic... hopefully!
Default Keybinds (can be edited in the Ini) - These can only be toggled/used while in an AnimScene (for example start of a mission)
F1 - Forces the Cutscene camera to use the gameplay camera, go into a mission cutscene, etc and press this then it'll kick in, press it again and the next shot in the Scene will default to the camera. This'll persist in each new AnimScene so you don't need to force this each time.
F2 - Forces first person/third person camera
F3 - Removes the black bars across the entire game
F7 - When pressed you'll have a camera you can guide around the cutscene (This has additional key inputs, see below.), this requires the F1 functionality to be active.
F9 - When perspective is active (F1), PedSnap can be used, when used this will select another character in the Scene with Arthur and attempt to get the camera to look at him (mimicking a first person view from their perspective)
F10 - Snaps it back to the forced perspective or Freecam if active.
O - Experimental feature added allows you to force a AnimScene (Cutscene), the names of these can be found in anim_0.rpf and in the AnimScenes folder, try it out (note must of these rely on the characters already existing so you may see invisible characters on most, but its fun to play around with)!
K - Toggles a PostFX visual, press it again to choose another, and keep cycling until you find one you like.
L - Removes all PostFX effects.
Cutscene freecam keybinds
WASD - Moves the camera around
Mouse - Moves the Camera around whereever you look
R - Raises the camera level
F - Lowers the camera level
1P3PCutscenes.rar- 1,432 Downloads
- 29986 Views
- 143.31 kB File Size
- 2 Comments
Updated -
 "There Is a Light That Never Goes Out" is a mod for Red Dead Redemption 2 that adds a permanent bonfire at every location where an NPC dies.
GAMEPLAY TRAILER:
INSTALLATION:
- Copy "thereIsALightThatNeverGoesOut.asi" into the root folder of RDR2.
USAGE:
- press F10 to toggle the mod
- the first time the mod is used, a text file called "output.txt" will be created in the root folder of RDR2
- press F11 to toggle snake mode
REQUIREMENTS:
- Script Hook RDR2 V2 by kepmehz (https://www.nexusmods.com/reddeadredemption2/mods/1472?tab=files&file_id=16307) NOTE: if you use Alexander Blade's Script Hook RDR2, the mod will not work properly.
- dinput8.dll (https://github.com/ThirteenAG/Ultimate-ASI-Loader/releases/download/x64-latest/dinput8-x64.zip)
2girls1comp would like to thank Jon Uriarte for his unapologetic killing sprees which allowed us to playtest the mod. -
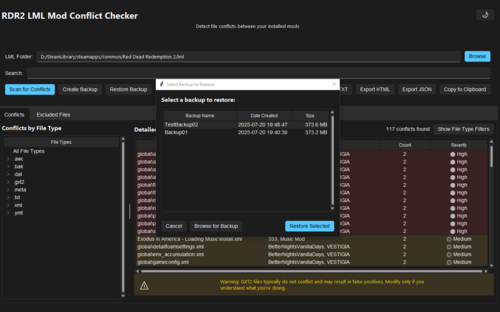 RDR2 LML Mod Conflict Checker
Quickly detect file conflicts between your installed Lenny’s Mod Loader (LML) mods for Red Dead Redemption 2.
This tool helps identify and resolve file conflicts between installed LML mods by scanning your LML directory, flagging overlapping files, and categorizing conflicts by severity.
Key Features
Conflict Detection & Classification
Scans your LML folder for overlapping files between mods
Flags file conflicts and assigns severity (e.g., .meta = high risk)
Displays affected mods, file paths, and conflict counts in a clean grid
Color-coded mod names for quick identification
User Interface
Modern, dark and light-themed UI with grid-style conflict viewer
Sortable columns, collapsible file-type filters, and search bar for fast navigation
Live summary showing total conflicts, affected mods, and severity breakdown
Export & Reporting
Export results in multiple formats:
.TXT — simple plain text
.HTML — clean, collapsible report
.JSON — structured data for scripts and automation
Copy selected results directly to clipboard
Backup & Restore
One-click ZIP backup of your entire LML folder
Restore previous mod states with easy backup selection dialog
Backups include metadata like creation date and file count
Option to create automatic backup before restoring
Important: Never store backups inside the LML folder — they’ll be scanned as mods and may be deleted or misclassified
Mod File Comparison Tool (New!)
Side-by-side comparison of mod files with left and right panels highlighting differences
Edit files directly within the comparison tool and save changes
Enhanced search highlights for better navigation inside the compare window
Updated compare window colors to a white background with yellow highlights for better readability and reduced lag
Additional Features
Ko-fi support button integrated in the UI for easy donations
Warning displayed about GXT2 files: they typically do not cause conflicts and may generate false positives; modify only if you understand the risks
Technical Info
Platform: Windows 10 or newer
No install required: runs as a standalone executable
Known Issues
Visual enhancements and performance optimizations are ongoing
Some file types may not yet display full metadata
The compare tool and overall program performance are being improved to reduce lag
More features will be added in future updates. If you encounter issues, please use the Bug Report section. Feature requests and suggestions are welcome in the Posts tab. Development is ongoing as time allows.
Important Note About False Positives
Important: Some antivirus software may mistakenly flag this program as harmful. This is a false positive caused by how the executable is packaged and does not mean the program contains any malware. If you encounter warnings, please rest assured the software is safe to use. For best results, add the program to your antivirus’s whitelist or exceptions.
Full Source Code: Available on GitHub - review it yourself!
- 1,240 Downloads
- 17255 Views
- 91.61 MB File Size
NomadsVoid in ToolsUpdated -
-
 What this mod does?
It's a simple script mod that mod makes NPCs ragdoll when you shove them just like in Grand Theft Auto IV. This effect is also applied to grapple throws and can be disabled.[Showcase]
[Features]
When the will the stumble effect get activated is carefully set for each grapple style and brawling style to not cause any problems with animations.
- Shoving makes NPC "stumble". Every shove animations except environmental ones result in NPCs stumbling.
- Armed shove animations also result in same effect.- BS_MICAH_FINALE's grapple throw animations will also work without any problem.- You can disable grapple throw ragdoll from the Dynamic Shove & Throw.ini.
[DONATIONS]
Here's my Patreon if you want to support me.
[My other mods]
Enhanced Brawling
Grapple Reversals
Bar Brawls -
 Beecher's Hope is not a fucking desert anymore.
Added more lights, populated area and more trees.
Well, Beacher's Hope is a more livable place now.
This map only looks realistic during not rainy weather and daytime hours. !
Some objects may spawn in weird places, this is a problem caused by MapEditor.
You can convert this map to ymap from MapEditor if u want.
Requirements
MapEditor
Scripthook V2
Installation
-Firstly if you didnt installed Scripthook before, we have to install it.
-I recommended to install Scripthook V2 because V1 version did make my game crashed.
-All you have to do is copy and paste files where RDR2.exe located.
-After the install the Scripthook, install MapEditor.
-Like what we did it before, copy and paste the files to where RDR2.exe is located.
-All finished! Lets install the Beecher's Hope Remastered map.
-Drag and drop MapEditor folder into where RDR2.exe located.
-Open the game and press F9 MapEditor must be opened, after that select Load Map option and load the map.
Credit
-Burak Kaleli
No fucking copyrights reserved.- 1,583 Downloads
- 21012 Views
- 60.88 kB File Size
BuraKaleli in MapsUpdated -
 RedCallouts
This callout pack currently has 4 callouts.
Solve Murder 🕵️♂️ - A little murder scene where you have to listen to the story the peds tell you and investigate!
Bandit Attack 🤠 - Defend the person in need of help and yourself from waves of gang attackers!
Stolen Stagecoach 🐎 - The stagecoach was spotted by a local - Apprehend him!
Horse Thief 🐎 - Track down the horseman and arrest him!
Bugreports & Feedback
can be submitted on my discord server https://discord.gg/utNranQJSr
Installation
Drag-and-drop the folder in your rdr2 main folder.
© 2025 RedCallouts by Yasd. All rights reserved. Do not modify or share it without my consent. -
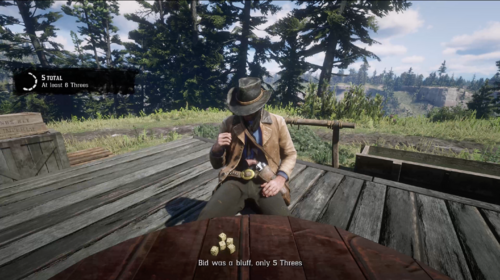 https://youtu.be/Jv2a0pAzII4
Play Liar's Dice in Red Dead Redemption 2
Two locations are available for play, from 5am-8pm in-game time:
Wallace Station Aurora Basin (Epilogue only)
Each game starts with 3 players, with 5 dice for each player. Players can Raise, Call bluffs or Call spot-on bids during each turn. Playable as Arthur and John Marston.
Known issues:
Occasional seat adjustment animations (these are intermittent, the seated animation looping system is fairly complicated) Incorrect seat rotations after playing multiple games (this is usually corrected at the start of every round) Using "Model changer" mod to change the player model breaks this game (will work again after restarting the game) -
 Dynamite, Machete, Bow, Incendiary, Explosive Ammo and more! Forget realism for a while and have fun!
This is a script file made by me to randomize most NPC weapons and ammo; idk I just wanted the gameplay to be chaotic 😄 Guns can range within Pistols, Repeaters, Melee, Shotgun, Rifles, Sniper Rifles and Throwables. Peds cannot equip online weapons so those are not included. This is my very first mod in RDR2, and it took quite a while for me to get used to it, so if anyone faces issues during gameplay let me know. READ the BUGS section below!
Installation - Put both files in RDR2 Root directory, that is the folder where you have RDR2.exe. Press F2 to start. You can change the hotkey by editing the key number Randomizer_Config.ini.
Requirements - ScriptHookRDR2 V2.
BUGS -
1)I haven't thoroughly tested the mod, but since this mod tries to swap almost all weapons, it is possible some weapons will be unlocked for you early (if you just started the game and picked up one of the enemy weapons).
2)Also, some weapons which are acquired via certain missions might get glitched, so in those cases its preferrable to disable the mod, die and restart the mission.
...or just use a Trainer to get the gun 🙂
3)Since enemies can use Incendiary and Dynamite ammo, ally peds can easily die from it! I tried to counter it by increasing Ally peds' health, but it might not be enough and you might mission fail occasionally. So be careful and aim quick!!
CREDITS - The Brilliant people from the Modding discord server who assisted me in creating the mod! Big thank you to PixieV, Transflux, Tuffy, Timmy_theBarbarian, Ked, and some more! (whose names I forgot D:)
-
.thumb.png.d040cc8da77cbe0d9e294de32d6f3878.png) Bu mod sayesinde "Mary Linton Joins The Gang" modundaki diyalogları Türkçe'ye çevirebilirsiniz!
Bu mod sayesinde "Mary Linton Joins The Gang" modundaki diyalogları Türkçe'ye çevirebilirsiniz!
(Çeviri makine çeviridir.hatalar olabilir)
Yapmanız gerekenler sadece indirdiğiniz Language.dat dosyasını Mary Linton Joins The Gang modundaki Mary_Linton klasörüne atıp Hedefteki Dosyayı Değiştir demek!
Daha fazla bilgi için Discord Sunucumuz:
https://discord.gg/qSgnGVggbF
https://www.hilevecrack.com.tr
- 176 Downloads
- 6011 Views
- 4 kB File Size
Updated -
- 571 Downloads
- 7928 Views
- 7.54 kB File Size
Sonnybhoy67d in MapsUpdated -
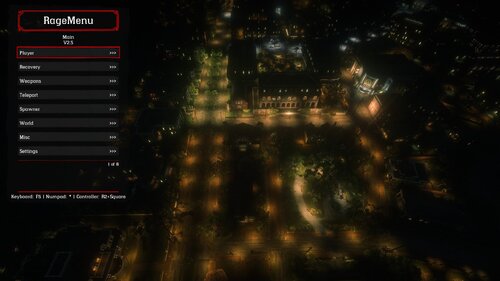 OVERVIEW
RageMenu is a single player ASI mod for Red Dead Redemption 2, built in C++ by Kapiushon and Isac. It is designed to provide useful essential features that enhance your gameplay experience without overcomplicating the menu with unnecessary options. RageMenu offers a familiar user interface .
Please Also Note That RageMenu Was Designed To Work Independently. Compatibility With Other Mods Is Not Guaranteed, And Support Cannot Be Offered For Issues Caused By Other Mods.
INSTALL
RageMenu is installed just like any other mod, Place the "RageMenu.asi" file inside your rdr2 root (where rdr2.exe is located).
RageMenu.asi also requires a hooking process like ScripthookRDR2 by alexzander blade.
CONTROLS
[KEYBOARD]
[ F5 ] - Open Menu ( Default)
[Arrow Up] - Up
[Arrow Down] - Down
[Arrow Left] - Left
[Arrow Right] - Right
[Enter] - Select
[Back] - Back
[NUMPAD]
[Asterisk] - Open Menu (Default)
[8] - Up
[2] - Down
[4] - Left
[6] - Right
[5] - Select
[0] - Back
[CONTROLLER]
[R1+Square] - Open Menu (Default)
[Depad UP] - Up
[Depad Down] - Down
[Depad Left] - Left
[Depad Right] - Right
[X] - Select
[Circle] - Back
Discord
Join our community for support, feature suggestions, bug reporting, or just to hang out! Our Discord server is the first place to hear about updates. https://discord.gg/FMcy3Sxq6T
Notes
My Nexus Page is my main but I will still keep this page up to date.
- 8,159 Downloads
- 54634 Views
- 444.2 kB File Size
Updated